Key Takeaways
- How to evaluate light quality, direction, and color
- Working with window light for stunning indoor portraits
- Mastering golden hour for outdoor photography
- Using open shade and overcast conditions
- Creating dramatic backlit images
- Hawaii's unique tropical light characteristics
Learning to See Light
Most people experience light unconsciously—it's just "there." Photographers train themselves to consciously observe light. You start noticing how window light wraps around a face, how shadows fall at different times of day, how overcast skies create natural softboxes.
Three characteristics define any light source:
Quality: Hard vs. Soft
Hard light comes from small, distant sources relative to the subject. It creates sharp shadows with defined edges. Direct sun at noon is hard light—shadows under eyes, harsh contrast.
Soft light comes from large sources relative to the subject. It wraps around forms, creates gradual shadow transitions, and is flattering for portraits. Cloudy skies, large windows, and reflectors create soft light.
Light softness depends on the apparent size of the source relative to the subject. The sun is enormous but appears small from Earth—hard light. Move a speedlight into a 4-foot softbox held 3 feet from the subject—the softbox appears huge relative to a face—soft light. Distance matters: move that same softbox to 20 feet away, and it appears small again—harder light.
Direction: Where Light Comes From
- Front light: Source behind the camera, illuminating the front of the subject. Flat, even lighting with minimal shadows. Safe but can be boring.
- Side light: Source to the left or right of the subject. Creates dimension through shadows, reveals texture. Often most flattering at 45 degrees (Rembrandt lighting).
- Backlight: Source behind the subject. Creates silhouettes, rim light, and lens flare. Dramatic but requires careful exposure.
- Top light: Source above the subject. Creates raccoon eyes and harsh shadows under features. Generally unflattering for portraits.
Color: Temperature and Tint
Light has color, measured in Kelvin:
- Warm (2000-4000K): Candlelight, tungsten bulbs, sunrise/sunset. Orange/yellow tones.
- Neutral (5000-5500K): Midday sun, flash. Appears white.
- Cool (6000-10000K+): Overcast sky, shade, blue hour. Blue tones.
White balance corrects for color temperature so white appears white. Auto white balance works for most situations, but manual adjustment helps in mixed lighting.
Window Light: Indoor Magic
Windows act as natural softboxes—they're large relative to subjects and provide soft, directional light. Mastering window light is essential for getting-ready coverage, indoor portraits, and detail shots.
Finding Good Window Light
- Look for indirect light: North-facing windows (in the northern hemisphere) never receive direct sun. East windows work in afternoon, west in morning. South windows are tricky—direct sun creates hard light.
- Sheer curtains are your friend: They diffuse direct sun into soft, flattering light.
- Distance from window matters: Close to the window = brighter but more contrast. Farther = dimmer but softer falloff.
Window Light Techniques
Loop Lighting: Position subject at 45 degrees to the window. Their nose casts a small loop shadow on the opposite cheek. Classic, flattering portrait lighting.
Split Lighting: Position subject perpendicular to the window. Half the face is lit, half in shadow. Dramatic, moody effect.
Butterfly Lighting: Position window directly in front and slightly above subject. Shadow under nose resembles a butterfly. Flattering for most face shapes.
Flat Lighting: Subject faces window directly. Even, minimal shadows. Less dramatic but very flattering for close-ups.
During bridal prep, find the room's best window. Position the bride (or whoever you're photographing) near that window for hair, makeup, and dress shots. Ask if furniture can be moved closer to windows. Scout the venue ahead if possible to identify the best light.
Golden Hour: Outdoor Magic
Golden hour occurs roughly 30-60 minutes after sunrise and before sunset. The sun is low on the horizon, its light traveling through more atmosphere, which filters out blue wavelengths leaving warm, soft illumination.
Why Golden Hour Works
- Color: Warm tones are universally flattering for skin
- Angle: Low sun creates side lighting that sculpts faces
- Quality: Atmosphere softens the light compared to midday
- Drama: Long shadows and warm colors create emotion
Golden Hour Techniques
Frontlit: Sun behind the camera lighting subjects' faces. Warm, glowing skin. Clean and simple but can cause squinting.
Sidelit: Sun to the side of subjects. Dimension and texture. Position subjects so light illuminates the "leading" side of their face.
Backlit: Sun behind subjects. Creates rim light (glowing edges), lens flare, and dreamy atmosphere. Expose for skin, let background blow out. Add flash or reflector if faces go too dark.
Silhouettes: Sun behind subjects, expose for the sky. Subjects become black shapes against colorful sky. Works best with clear outlines and space between subjects.
Hawaii's relatively southern latitude means golden hour is shorter than mainland locations. In summer, sunset happens around 7 PM with about 20-30 minutes of prime golden light. In winter, sunset is around 6 PM with similar golden hour duration. The transitions are quick—be ready before the sun drops low, and work fast during peak color.
📹 Video Lesson: Golden Hour Mastery
Learn how to capture stunning portraits during the magic hour with these professional techniques:
Timing Golden Hour
Apps like PhotoPills, The Photographer's Ephemeris, or simple sunrise/sunset calculators help you plan. For wedding portraits, schedule couple photos to end at or just after golden hour—that final 30 minutes creates your most dramatic images.
Open Shade: Your Midday Solution
When the sun is high and harsh, find shade. Open shade—shadow with open sky visible—provides soft, even light that's excellent for portraits.
Finding Good Open Shade
- Building overhangs: North-facing sides of buildings offer consistent shade
- Tree lines: Edge of tree coverage, facing outward toward open sky
- Covered porches: Great for group shots
- Garage doors: Open the door, face subjects toward the opening
Watch for Color Contamination
Shade often picks up color from surroundings. Green grass bounces green light onto faces. Red brick walls add warm contamination. Position subjects to minimize unwanted color casts, or correct in post-processing.
The Catchlight Test
In open shade, look at your subject's eyes. You should see the sky reflected as a catchlight. If their eyes appear dead (no catchlight), they're too far into shade. Move them toward the edge where open sky illuminates their face.
Overcast Days: Nature's Softbox
Overcast skies act as giant diffusers, transforming the sun into soft, even light. Many photographers prefer overcast for portraits—no harsh shadows, no squinting, soft and flattering.
Working in Overcast
Look for direction: Even on overcast days, one side of the sky is typically brighter. Position subjects to face that direction for catchlights and subtle modeling.
Watch for flat light: Very thick overcast creates extremely flat, directionless light. This can look dull. Use compositional elements, wardrobe, and color to create visual interest.
Sky decisions: Overcast skies are often bland white. Either crop them out or use compositions where the sky isn't prominent.
Don't let overcast weather disappoint you. Some of the most elegant, timeless wedding images are made on overcast days. Colors appear more saturated, skin looks flawless, and there's no fighting shadows. It's different from golden hour drama, but beautiful in its own way.
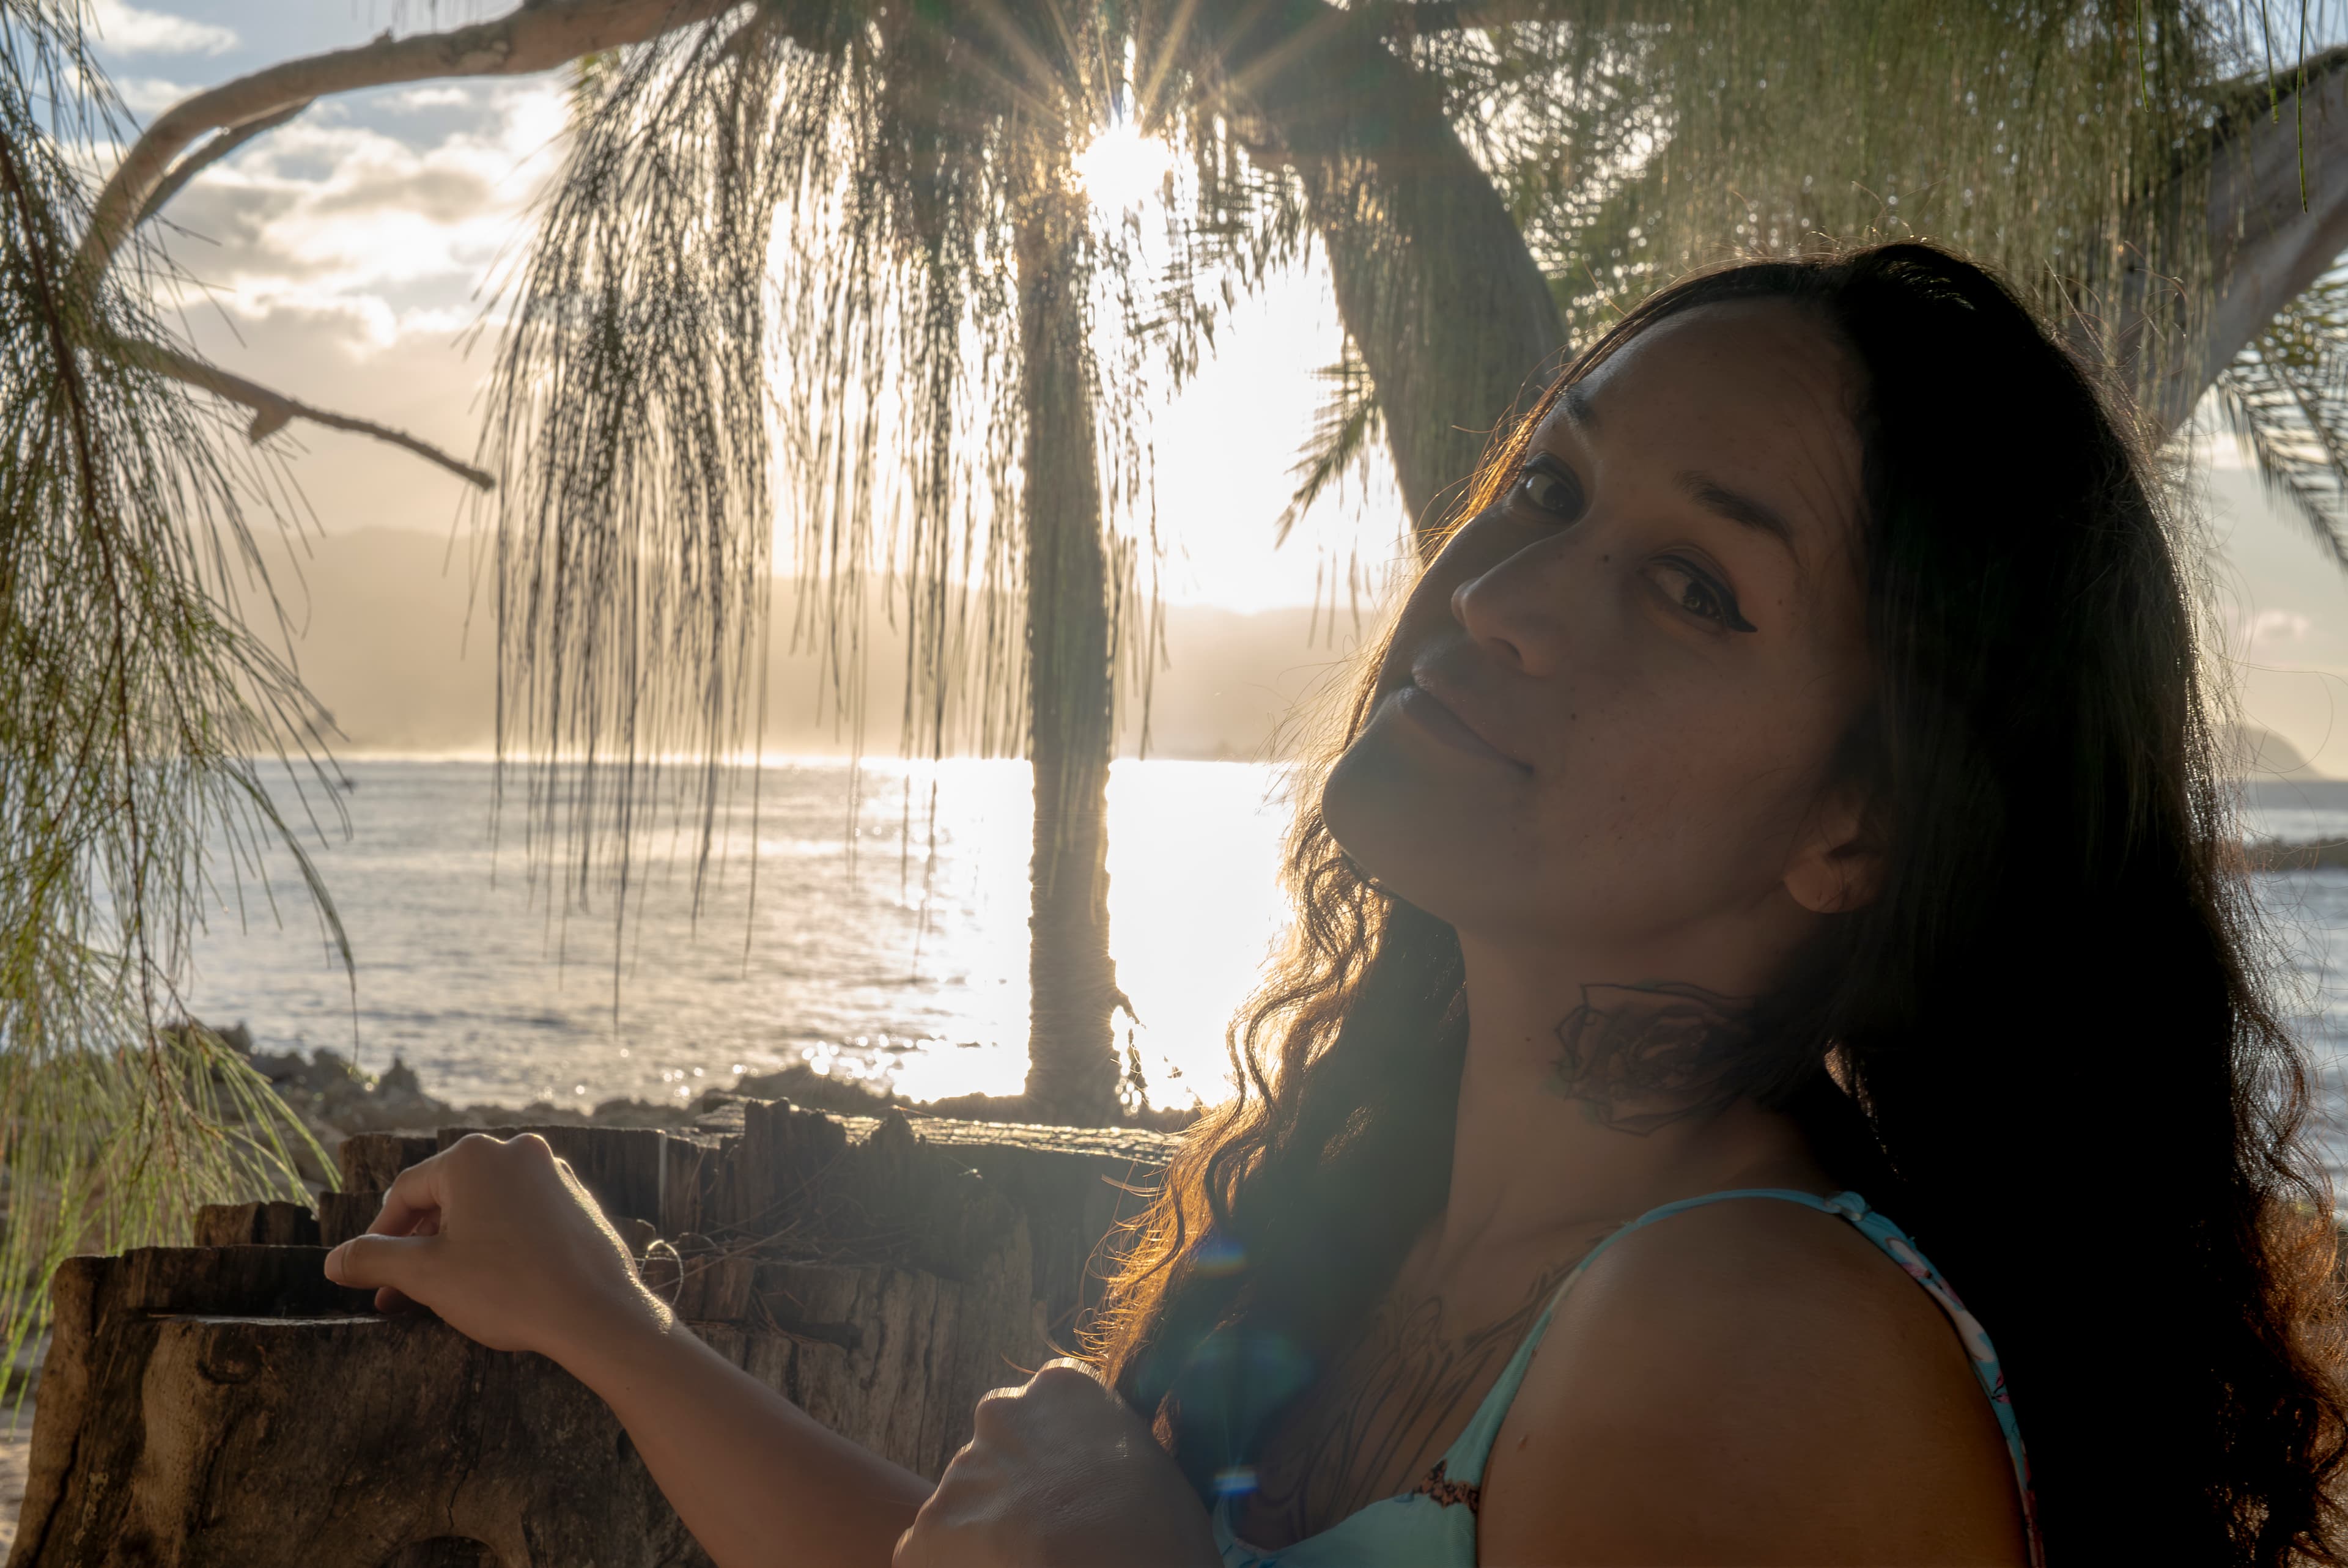
Backlighting: Creating Drama
Backlighting—light behind the subject facing the camera—creates some of the most dramatic and romantic wedding images. It's also one of the most challenging techniques to master.
Backlight Effects
Rim light: Light wraps around the subject's edges, creating a glowing outline. Separates subject from background beautifully.
Lens flare: Light enters the lens at an angle, creating streaks and haze. Can be artistic or distracting—control it with lens position and flagging.
Silhouettes: Subject becomes a dark shape against the bright background. Powerful for dramatic moments.
Exposing for Backlight
Your camera's meter will be fooled by backlight. Two approaches:
- Spot meter on skin: Use spot metering to measure light on your subject's face, ignoring the bright background. The background will overexpose (blow out), but the subject will be properly lit.
- Manual calculation: Set exposure for shade (where your subject's face is), let the background take care of itself. A safe starting point: ISO 200, f/2.8, 1/200 on a sunny day.
Embrace blown highlights. The dreamy, ethereal look of backlit photos comes partly from the bright, overexposed background. Don't fight it.
When Backlight Needs Help
Sometimes pure backlight leaves faces too dark. Solutions:
- Reflector: Bounce light back into faces. Gold warms skin; silver is brighter and cooler; white is subtle and natural.
- Fill flash: Add just enough flash to illuminate faces without overpowering the backlight effect.
- Post-processing: Modern cameras have tremendous shadow recovery. Expose to protect highlights and lift shadows in editing.
Hawaii's Unique Light
Hawaii's light differs significantly from mainland conditions:
Intensity
Hawaii sits closer to the equator than most US locations. UV radiation is higher, and light intensity is stronger. Midday sun can be brutal—more need for shade and fill than you might expect.
Trade Wind Clouds
Trade winds bring passing clouds that create constantly changing light. One moment harsh sun, the next soft diffusion. Stay aware and adapt quickly. This can be a gift—dramatic cloud breaks during golden hour create spectacular images.
Ocean Reflection
Water acts as a giant reflector, filling shadows and adding sparkle. Position subjects with ocean behind or beside for natural fill. The reflection can also cause underexposure—add +0.5 to +1 stop compensation for beach portraits.
Green Bounce
Lush tropical vegetation bounces green light onto subjects. Under palm trees or near dense foliage, watch for green color casts on skin. Correct in white balance or avoid the greenest areas for portraits.
Golden Hour Color
Hawaiian sunsets are legendary. The combination of clear ocean horizon, tropical humidity, and trade wind clouds creates extraordinary color. Don't miss this opportunity—it's often the most photographed moment of a Hawaii wedding.
Modifying Natural Light
Sometimes natural light is almost right but needs tweaking. Simple tools help:
Reflectors
Bounce existing light back into shadow areas. Essential for backlit portraits. A 42" collapsible reflector handles most situations. White side for subtle fill, silver for strong fill, gold for warm fill.
Scrims/Diffusers
Place between sun and subject to soften harsh light. Turn hard sun into soft window light anywhere. Takes an assistant to hold, but transforms midday portraits.
V-Flats
Large foam boards (white or black) that reflect or absorb light. Used mainly in controlled environments like getting-ready rooms. White bounces light into shadows; black absorbs it for more contrast.
Practice Exercises
- Window study: On a sunny day, photograph a subject near different windows at different times. Observe how light quality changes.
- Golden hour commitment: Photograph during golden hour for 30 consecutive days. Learn its progression and variations.
- Shade hunt: At midday, find 5 different open shade locations. Photograph portraits in each. Compare quality.
- Backlight challenge: Shoot 20 backlit portraits with different exposures and fill techniques. Identify your preferred look.
Summary
Natural light mastery comes from observation and practice. Key principles:
- Quality: Hard light creates drama and shadow; soft light flatters and wraps.
- Direction: Side light sculpts; front light flattens; back light creates drama.
- Windows: Your indoor softbox. Find them, use them, love them.
- Golden hour: Plan for it. Your best outdoor portraits happen here.
- Open shade: Your midday solution for soft, flattering light.
- Backlight: Dramatic and romantic but requires exposure control.
- Hawaii specifics: Intense sun, quick golden hour, ocean reflection, and legendary sunsets.
Train your eyes to see light consciously. Notice it when you're not shooting. Eventually, you'll walk into any space and immediately identify the best light—where to position subjects, how to expose, what tools might help. That instinct is what separates natural light masters from photographers who just hope for the best.